You should start a Mission when you start monitoring a specific shipment. A Mission helps you attribute measurements collected by a logger or several loggers to that shipment. Moreover, you will receive alert notifications if the conditions were unacceptable. Afterward, you'll be able to analyze your data and download PDF reports on the shipment.
Your workflow:
Prerequisites
First steps
Fill in Basic Settings
Fill in Advanced Settings
Set up Scan page config
Set Mission ending preferences for the Scan page
Set permissions
Prerequisites
- from desktop
Log into your Logmore account at web.logmore.com. You would need to know the unique ID of the loggers you're going attach to the Mission. - from smartphone
Make sure your smartphone is connected to the Internet and can read QR codes. Log into your Logmore account at web.logmore.com from your smartphone. - Mass scan and Scanpoint
If you are using the mass scan option, refer to this guide on the mass scan feature.
Note that it is not possible to start a new Mission with Logmore Scanpoint without premade Mission templates.
First steps (desktop)
-
Go to the Missions page, located on the left-side panel of your Logmore Cloud.
-
Click +New Mission and choose to continue without a template. This allows you to create a mission from scratch.
First steps (smartphone)
-
Scan the logger.
-
Click Create Mission and choose to continue without a template. This allows you to create a mission from scratch.
Fill in Basic Settings
-
Enter a name for the Mission to make it easy to identify (for example, shipment number + destination).
If you have your own shipment IDs, we recommend entering them either as the Mission name or in the Mission notes field.
-
Select the loggers you want to include in the Mission.
-
Create Alert rules.
Fill in Advanced Settings
- (Optional) Click on Advanced settings and configure Mission timeline (the default is "now").
- (Optional) Add Custom fields.
Set up Scan page config
-
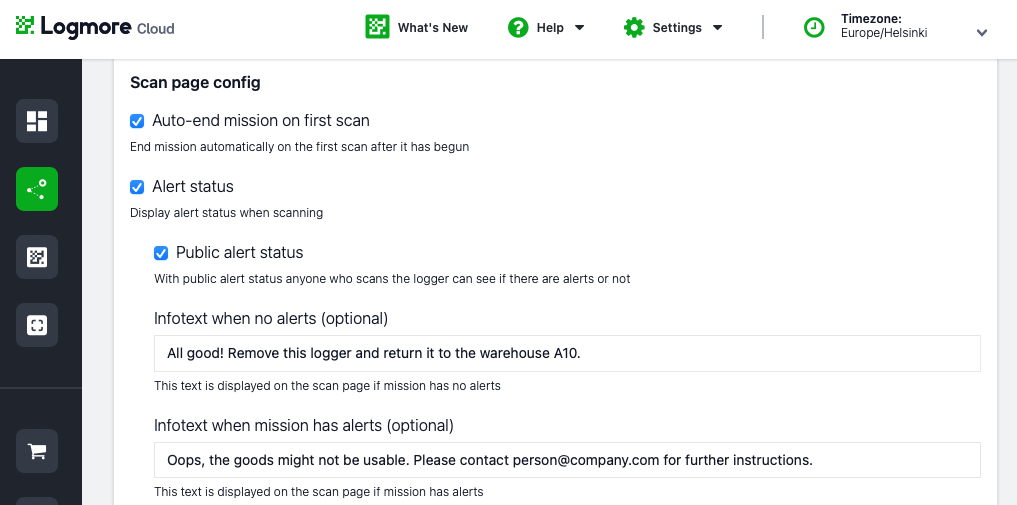
Check the box Auto-end mission on first scan if you want this mission to end after the logger has been scanned for the first time since the mission had started.
Use this function if the logger is scanned only on the recipient's end and not during the shipment duration.
-
To enable Scan page status alerts, check the box Alert status.
Make these status alerts public if you want anyone outside your team using Logmore to see them.
-
In Infotext, add a text that is displayed on the Scan page. You can set different messages for the Scan page with or without alerts.
For example, provide instructions on what should be done and who should be contacted when the mission has alerts. You can add instructions on how to return the logger.

Set Mission ending preferences for the Scan page
-
Check the box "End monitoring” button to allow for the mission ending from the Scan page. The person scanning will see this button on the screen.
Make this option public if you want anyone outside your team to end the mission.
-
Check Show alert status after mission ended and set the period for which the alert status page will appear. The person scanning the logger can see the alert status page for a specific time after the mission has been ended.
For a mission with several loggers, scanning one of the loggers or pressing the “End monitoring” buttonafter scanning will end this mission for other loggers attached to it. Enable Show alert status after mission ended for the receiver to see the alert status when scanning other loggers after the mission has been ended. -
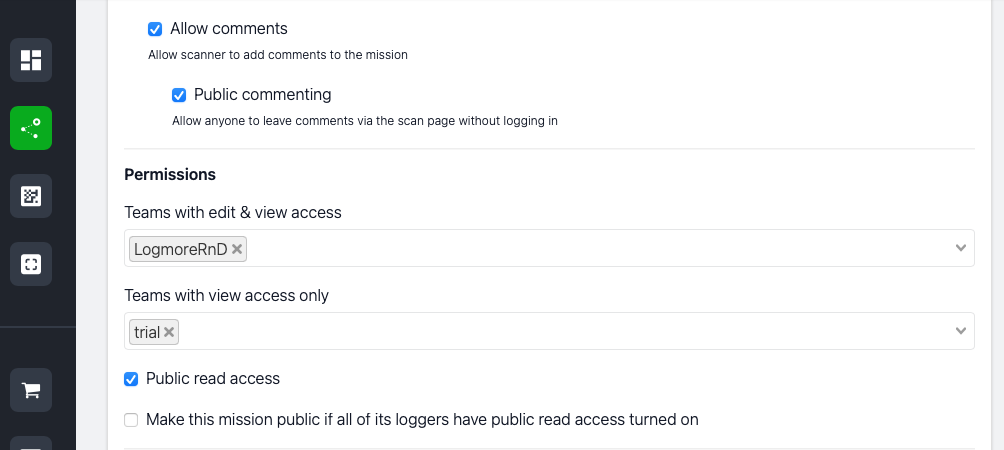
Allow comments if the person scanning the logger should add information about the shipment.
Make the commenting public to allow anyone to leave comments from the Scan page without logging in.

Set permissions
- In Permissions, define teams who can edit the mission and those teams who can only view the data.
- Check the box Public read access if you want anyone outside your teams to see the data connected to the mission (name, collected measurements, and timeline).
- Click Create.
